
Until people stop searching for things on the internet, blog content will have an important role in your business. That said, all internet users like to read blog posts.
So if you have an existing content marketing strategy pretty much dialed in using written content plus social media images etc, and are looking to expand out and develop a video marketing and YouTube strategy, then having a way to turn blog posts, existing articles, infographics, and other written content into videos is a solid starting point.
In this guide I’m going to show you some proven tips on how to turn a blog post into a video, using a process that many businesses are using to great success.
I’ll also dig into some of the software tools that can help you create videos, grow your YouTube channel and do fantastic video marketing!
How to Select Which Blog Posts to use to Create Videos for Your YouTube Channel
You want a great article to start with when you’re looking to turn blog posts into videos. It can be an old article that gets good web traffic, or a new blog post.
What we’re doing here is finding what content that already strongly resonates with people.
Instead of doing lots of work to research new topic ideas, stand on the shoulders of giants by improving what’s already working well, to bring even more traffic into your small business or SaaS product.
Identifying Popular Content
We want to ensure that the content is consistently popular, and not just because it got lucky with a particular week on social media for example. So the approach I reccomend is ‘SEO first’. This is something I initially learned when working on SEO for solar companies.
Using Ahrefs Site Explorer
Log into Ahrefs and go to site explorer, then type your domain in, and select ‘top pages’ on the right hand nav.
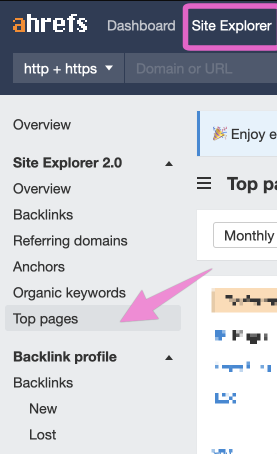
You should be able to see a list of top pages on your site. Export this as an excel file and then open that in your favourite spreadsheet editor (I’m using Google Sheets).
Next, you want to ignore pages like ad campaign landing pages, features, pricing, home page, about, etc. and focus on articles and blogs. You can even just delete those rows from your spreadsheet.
Make a note of content that has the most traffic, and also the ‘top keyword’ which will give you an idea of the intent behind a good amount of people who are finding your content from search engines.
Now, many of the entries on this should be great options to turn blog posts into videos.
Process for Creating Videos from Blog Posts
The actual video production process looks like this:
- Re-write the article into a video script
- Film a presenter reading the script
- Edit the presenter video
- Add stock video & basic graphics (titles, screenshots, illustrations)
- Refine the graphics (animate the illustrations etc)
- (Optional) Check the video internally
- Create optimised thumbnail, titles, tags and description for YouTube
- Publish to YouTube or schedule for your regular slot (1-3 times a month works well)
- Promote by adding to the orginal blogpost, sharing on social media and adding to email flows etc.
How to re-write an article as a video script for YouTube
The main things you want to aim for when turning a blog post into a video are: making it more conversational,and picking up the pace a little bit. Unfortuantly you can’t just 100% copy and paste text.
Videos typically work best when they’re around 50-80% of the word count of the original article.
It’s easier for people to skim text in articles, but for people who prefer video – they can’t do that as easily, so it helps to pick up the pace a bit.
If it’s a really long article, then you can split that into multiple videos.
For example: A 13,000 word epic skyscraper blogpost would take around 20-30 minutes for people to watch in full on YouTube depending on how good your video editor skills are!
To make your blog post more conversational, think about what people would say if they were talking to you explaining the story.
How does that sound? Can you speak it out loud, record yourself and then play back? Does that feel more conversational or natural than your original article did?
Is there another way to get across your main points whilst sounding a bit more like you’re explaining them to a friend?
This is an iterative process – looking at draft videos on a phone can be helpful for this.
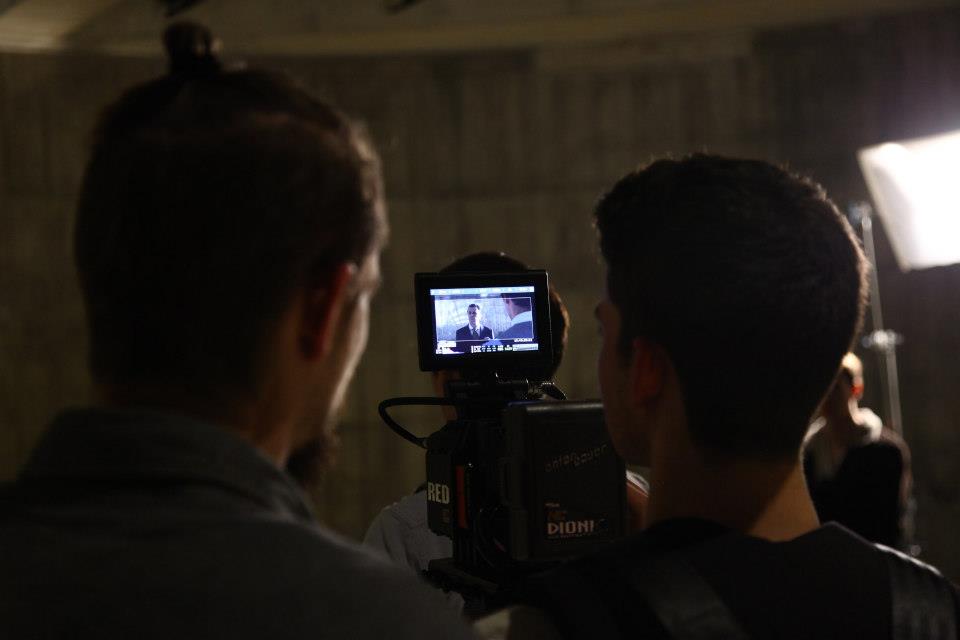
Film a presenter reading the script
To film a presenter reading the script, at the most basic level, all you need is a laptop and a desk.
If you’ve got an iMac or MacBook Pro with any kind of editing software on it then that’s great! Just set up your camera in front of you and hit record.
Of course, if you want more polished videos that help your company come across as friendly but still professional, then it’s better to invest in a professional setup.
You can either hire a presenter online who has an existing recording set up, or you can bring that role in house, either as a full time YouTube presenter role, or if you’re the co founder yourself then being the face of your own business (think Noah Kagan of AppSumo, or Richard Branson) also works well.
The presenter video content also provides the voice overs for parts of your YouTube video that have photos, slides, motion graphics, or stock footage on screen.
The ideal filming setup for YouTube is :
A DSLR camera (Canon and Nikon are the most common brands) with a ‘fast’ lens. Don’t worry about this too much, but it’s basically how well the camera performs in low light conditions – lenses like f/1.8 or f/2.8 let more light into your images.
Visually, it also helps blur the background and make the presenter ‘pop’ out from it.
A tripod. Again, any one you’ve got in your house will work for this – but if you want to invest in a good quality video camera setup then it’s worth also investing in tripods that are sturdy and reliable. It’s a tool that will last basically forever if you invest in a high quality one.
Wireless lav microphones (the small mic clips on the shirt). This means that your presenter can wander around the room, or at least face different directions without the audio getting quieter when they turn away.
Another great option is to simply have a condenser microphone on a stand on the desk, like you will have seen if you’ve ever tuned in for an episode of the Joe Rogan Experience.
Background: you have a few options here:
A green screen is tempting but actually quite hard to pull off without looking tacky. If you must go for a green screen, you really need to have a good amount of space, and invest heavily into good lighting.
This is because you need good seperation between the different light sources to ensure you don’t have ‘spill’ – green colour going across your presenter’s face.
Whiteboards – great if you want to run through the key points of your topic on screen with a presenter at the same time! But it can also end up looking tacky as they have been used a lot in ‘internet marketer’ style videos.
What I would reccomend however is a simple plain coloured background – ideally something dark like grey or black to make your presenter pop out, avoiding distracting backgrounds.
Pro tip: a classic lighting technique is to add a highlight just behind the presenter, as well as a side light to help them pop out even more cleanly.
You can buy a paper roll in most stationary shops (e.g: Paperchase) which is great for this – just unroll it on the background area, double side tape down along one edge onto the wall/floor etc. Again, the key here is good lighting, which I will cover in more detail in just a second.
Another great option is to create a casual office or home space which has a variety of foreground and background items to create a sense of depth.
This is where having a ‘fast’ lens comes in handy, as it can look really nice to blur the background in these types of setups.
One note that I’ve picked up from watching movies, is to always have a selection of lamps in the frame at different distances from the camera – it really adds to that sense of depth.
Editing the presenter video
The next step is to take the recording from the presenter, whether that’s something you’ve filmed yourself, or have hired a freelance presenter to record themselves, and edit it into the base of your video.
This is where you’re creating the structure of your video. Edit out any unnatural pauses or parts of the text which just don’t across as well when you hear them being spoken (as opposed to just reading on a screen).
Optional: Add music
Whether or not you want to add music to your video file is matter of opinion. A lot of good videos don’t have music, and you certainly don’t need it to do a great job with your YouTube videos. But sometimes it can help add personality and a powerful tool to enhance emotions. In other words – it’s your call.
Once this is done, you’re ready to move on to adding graphics to the video.
Add stock video & basic graphics
Now you’ll want to make the video more visually interesting than just a talking head, by adding relevant stock footage as well as graphics such as titles, screenshots, and illustrations .
A key tip here is to choose stock video which actually enhances the message you are trying to send, rather than just being pretty filler. For example, if you’re talking about how fast a car can go – do not use slow motion footage of someone running. Do instead use high speed camera technology that gives people an idea for what ‘fast’ really means.
Motion graphics titles help to break up the video and establish what you’re talking about at each point. You can also use them to add a bit of personality, so if your business has a mascot character or something similar – put it in there somewhere!
If you’re using a lot of graphics and illustrations, it can be helpful to give them all the same look and feel – maybe choose a colour palette that matches your company branding so they really fit in.
This is where most people get stuck when turning their blog posts into videos – but don’t worry! It’s actually quite straightforward if you do things in stages.
Don’t try to do a lot of fancy animation at first, just get the main building blocks in place by dropping in still illustrations (in vector format so they can be animated later).
Adobe After Effects is my favourite software tool to use here, but I hate to say it: you can even use Microsoft Powerpoint if that’s what you already know.
Remember that you can easily get good quality vector illustrations from sites like Envato or Creative Market.
Refine the graphics
Once you’re happy with the overal structure and flow, and you have an almost finished video, it’s time to add a bit of polish to your motion graphics.
This is where the fun happens! Explore different ways of animating your illustrations, to really bring them to life. You can also experiment with adding in extra details or embellishments that you couldn’t fit into the video’s structure before. For example, if there was a section about how much money something costs – you could have some numbers flip round on screen until they hit the correct figure.
Check the video internally
If you’re working with a video production consultant to get these videos done (like me), then typically you’ll get a chance to preview the video before it’s published, and make any last minute tweaks to ensure it’s on brand.
Or if you’re doing this in your in house marketing team, you can use a tool like Wipster to share videos with team members and get feedback before they go live.
If all has gone well, your video should be ready!
Create an optmised thumbnail, title, description, and tags for YouTube
The last step is to create a video which you can actually share online. This means uploading the file to YouTube, and then customising how it’s presented – including adding an attention grabbing thumbnail image, as well as a title, description and tags that will encourage people to watch (and hopefully share!) your awesome video.
It’s a fine line between accurate and on brand, and clickbaity (because you want people to actually watch!). Remember that YouTube takes into account both clickthrough rate and watch time in their algorithm, so you want to aim for a title that’s accurate but also enticing.
This is where having someone knowledgeable in your team (or outside help) will really pay off – because the best layout for your thumbnail image, plus a great description and keywords are essential at this stage, as they influence how likely people are to find it when searching online. And don’t forget about tags! Tags are a great way to describe your video within YouTube’s system, and also help with discoverability.
Remember that everything you do online is public – so if you’re going to put the effort into producing these videos for marketing purposes, make sure they’ll reach as many people as possible!
Upload to YouTube or schedule for your regular slot
Once you’re happy with the video, it’s just a case of uploading to YouTube – or scheduling for your regular slot (1-3 times per month often works well).
And voila! Your amazing blog post has turned into an awesome video that can be shared by your audience!
So what are you waiting for? Click publish and (optional) do a little dance of celebration.
Promote by adding to the orginal blogpost, sharing on social media and adding to email flows
The usual rules apply when you’re turning blog posts into videos…
Don’t just hit publish and hope for the best!
The final step is to promote your videos by adding links and embeds in the original blog post, sending out in your marketing emails, as well as sharing to Facebook, and your other social channels. Remember to also link to the original post page on your website for non video users.
Try to favour promoting it just to the most relevant audiences that you have on your email list and social media channels, as this will give your video the highest possible watch time percentage, leading to the best long term results.
If this all sounds like something you want help with, then please get in touch – I’d love to help.